Overview
Bài viết hướng dẫn cách cấu hình kết nối IPSec VPN site to site giữa tường lửa Sophos XG và SonicWall
Sơ đồ cấu hình
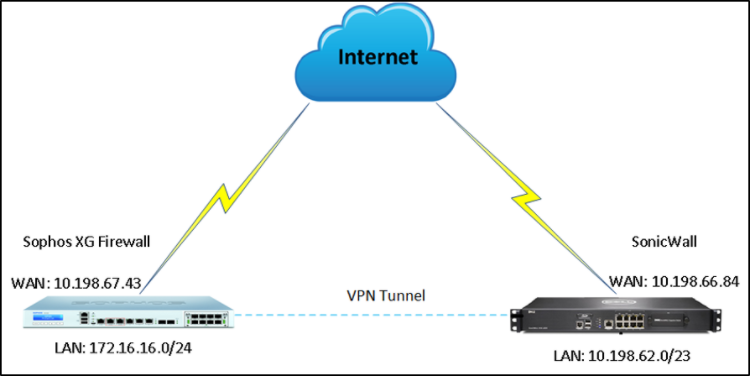
Hướng dẫn cấu hình
Trên thiết bị Sophos XG
- Đăng nhập vào Sophos XG bằng tài khoản Admin
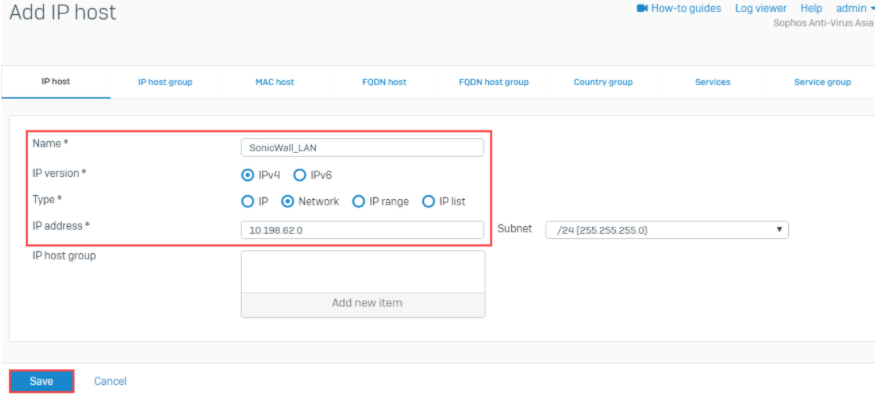
- Đi đến mục System -> Chọn Hosts and services -> Chọn IP host -> Nhấn Add để tạo một subnet Sophos LAN
- Nhập tên
- Ở mục IP version: Chọn IPv4
- Ở mục Type: Chọn Network
- Ở mục IP address: Nhập 172.16.16.0/24
-> Nhấn Save

- Nhấn Add để tạo thêm 1 subnet SonicWall LAN
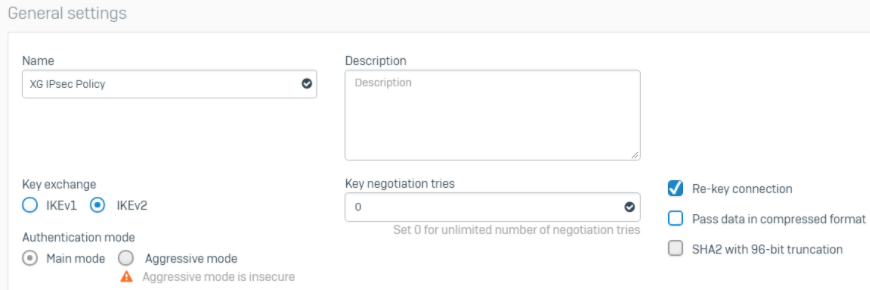
- Tạo policy IPSec VPN Sophos và SonicWall
- Đi đến Configure -> Chọn mục VPN -> Chọn mục IPSec policies -> Nhấn Add
- Nhập tên
- Ở mục Key exchange: Chọn IKEv2
- Ở mục Authentication mode: Chọn Main mode
- Ở mục Key negotiation tries: Nhập 0
- Chọn Re-key connection
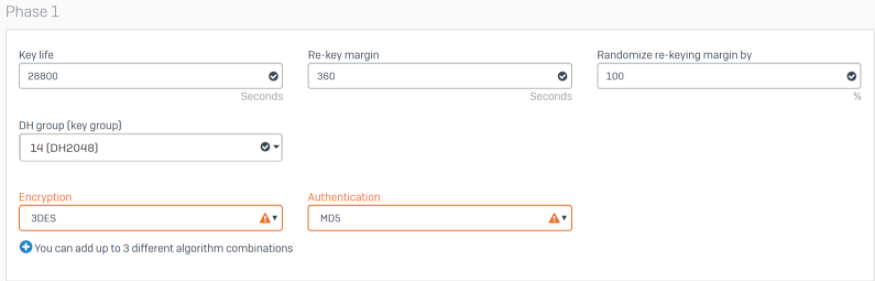
- Ở Phase 1
- Ở mục Key life: Nhập 28800
- Ở mục Re-key margin: Nhập 360
- Ở mục Randomize re-keying margin by: Nhập 100
- Ở mục DH group: Nhập 14 (DH2048)
- Ở mục Encryption: Chọn 3DES
- Ở mục Authentication: Chọn MD5
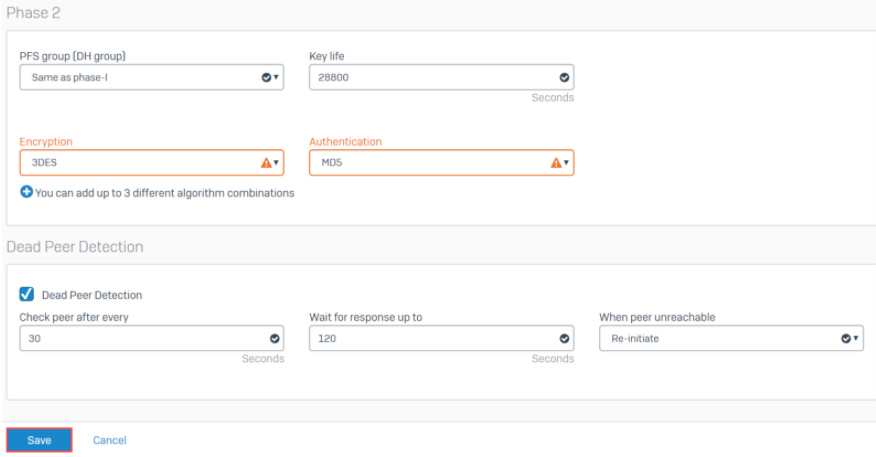
- Ở Phase 2
- Ở mục PFS group (DH group): Chọn Same as phase-I
- Ở mục Key life: Nhập 28800
- Ở mục Encryption: Chọn như Phase 1
- Ở mục Authentication: Chọn như Phase 1
- Chọn Dead Peer Detection: Để thông số như mặc định
-> Nhấn Save
- Tạo kết nối IPSec VPN giữa Sophos XG và SonicWall
- Đi đến mục Configure -> Chọn mục VPN -> Chọn mục IPSec connections -> Nhấn Add
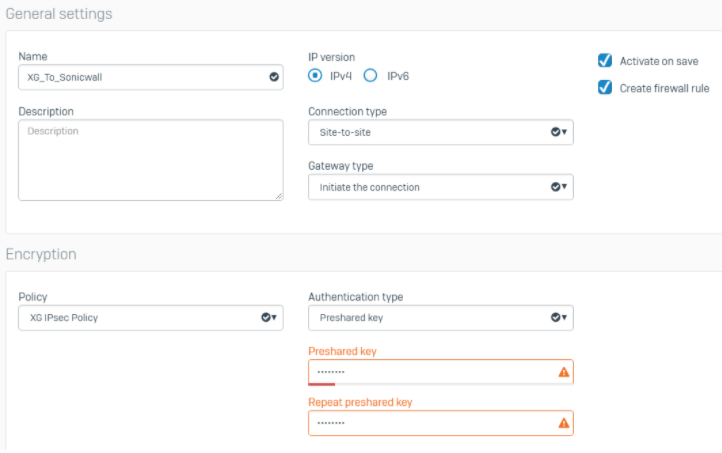
- Nhập tên
- Ở mục IP version: Chọn IPv4
- Ở mục Connection type: Chọn Site-to-site
- Ở mục Gateway type: Chọn Initiate the connection
- Chọn mục Active on save và Create firewall rule
- Ở mục Policy: Chọn policy giữa Sophos XG và SonicWall đã tạo trước đó
- Ở mục Authentication type: Chọn Preshared key
- Nhập Preshared key
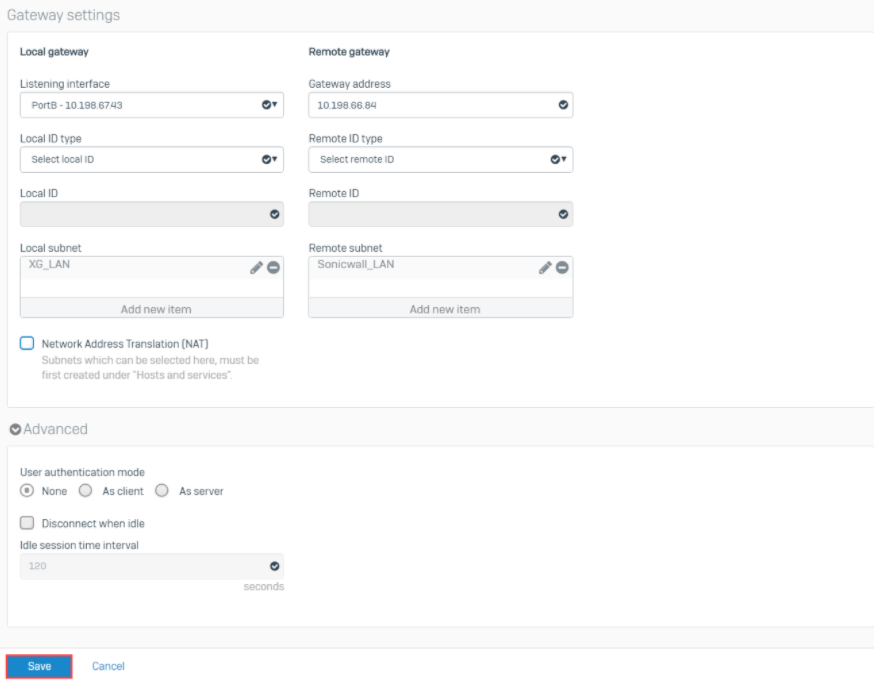
- Ở mục Local gateway
- Ở mục Listening interface: Chọn port WAN của Sophos XG
- Ở mục Local subnet: Chọn subnet Sophos LAN đã tạo trước đó
- Ở mục Remote gateway
- Ở mục Gateway address: Nhập IP WAN của SonicWall
- Ở mục Remote subnet: Chọn subnet SonicWall LAN đã tạo trước đó
- Ở mục User authentication mode: Chọn None
-> Nhấn Save
Trên thiết bị SonicWall
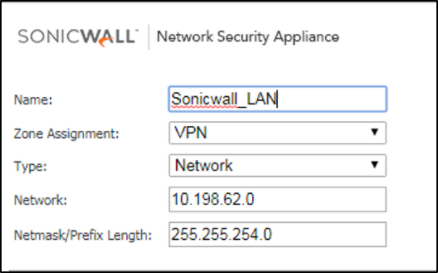
- Tạo Local network
- Nhập tên
- Ở mục Zone Assignment: Chọn VPN
- Ở mục Type: Chọn Network
- Ở mục Network: Nhập subnet LAN của SonicWall
- Ở mục Netmask/Prefix Length: Nhập netmask của subnet LAN
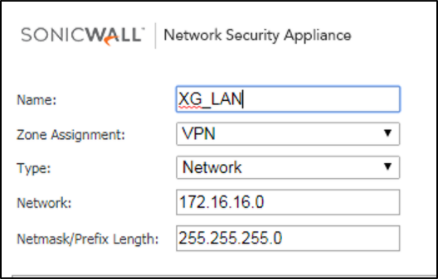
- Tạo Remote network
- Nhập tên
- Ở mục Zone Assignment: Chọn VPN
- Ở mục Type: Chọn Network
- Ở mục Network: Nhập subnet LAN của Sophos
- Ở mục Netmask/Prefix Length: Nhập netmask của subnet LAN
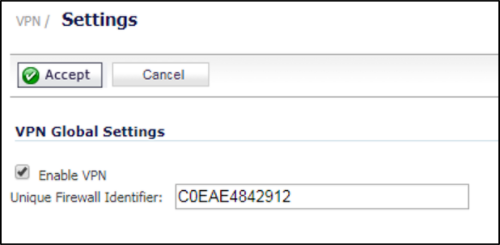
- Đi đến VPN -> Chọn mục Settings -> Enable VPN
- Ở mục Unique Firewall Identifier: Nhập serial của thiết bị SonicWall
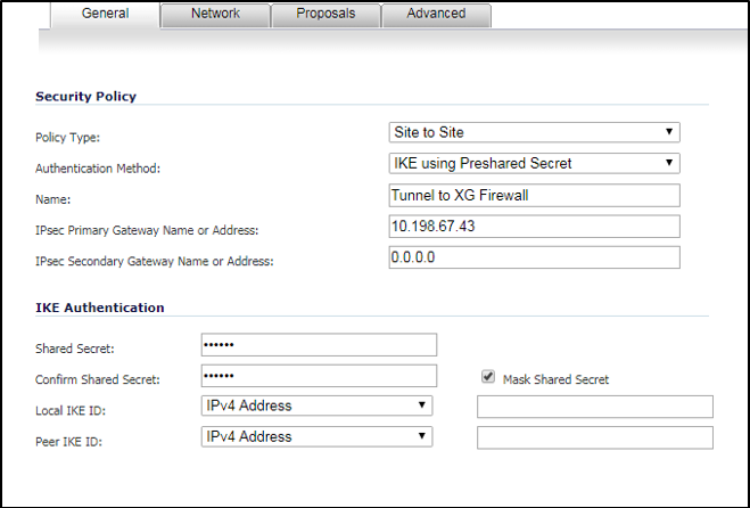
- Ở tab General
- Tạo VPN policies -> Nhấn Add
- Ở mục Policy Type: Chọn Site to Site
- Ở mục Authentication Method: Chọn IKE using Preshared Secret
- Ở mục Name: Nhập tên
- Ở mục IPsec Primary Gateway Name or Address: Nhập IP WAN của Sophos
- Ở mục Shared Secret: Nhập Preshared key tương đồng với Preshared key đã nhập trên Sophos
- Ở mục Local IKE ID: Chọn IPv4 Address
- Ở mục Peer IKE ID: Chọn IPv4 Address
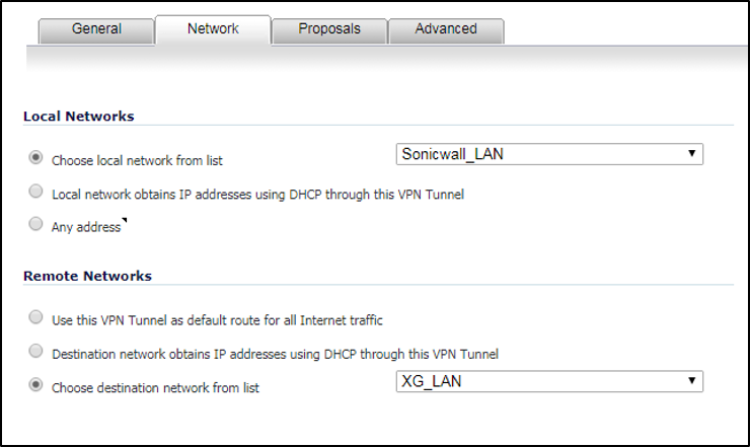
- Ở tab Network
- Ở mục Choose local network from list: Chọn subnet SonicWall LAN đã tạo trước đó
- Ở mục Choose destination network from list: Chọn subnet Sophos LAN đã tạo trước đó
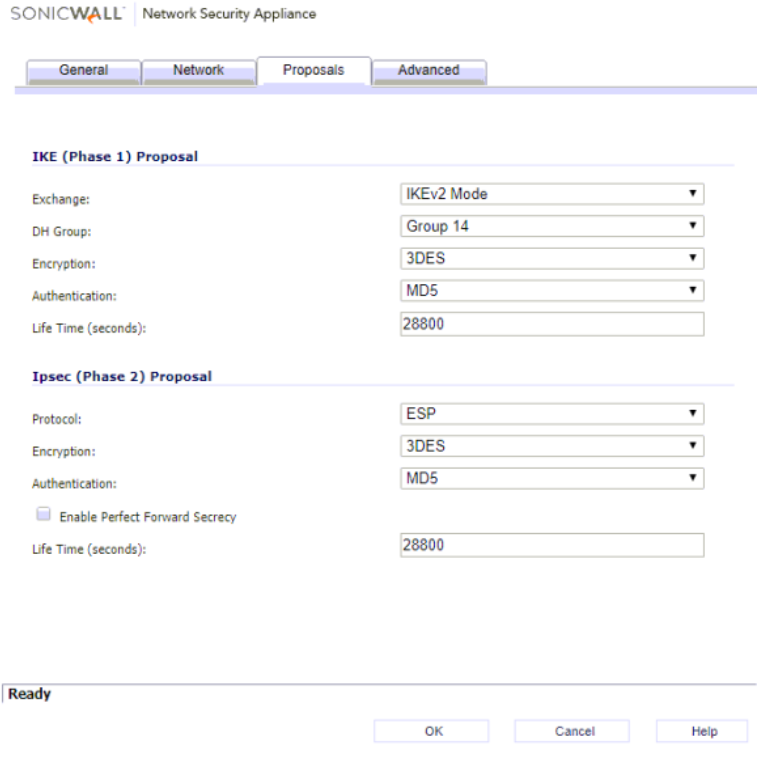
- Ở tab Proposals
- Ở mục Exchange: Chọn IKEv2 Mode
- Ở mục DH Group: Chọn Group 14
- Ở mục Encryption: Chọn 3DES
- Ở mục Authentication: Chọn MD5
- Ở mục Life Time (seconds): Nhập 28800
- Ở mục Protocol: Chọn ESP
- Ở mục Encryprion: Chọn 3DES
- Ở mục Authentication: Chọn MD5
- Ở mục Life Time (seconds): Nhập 28800
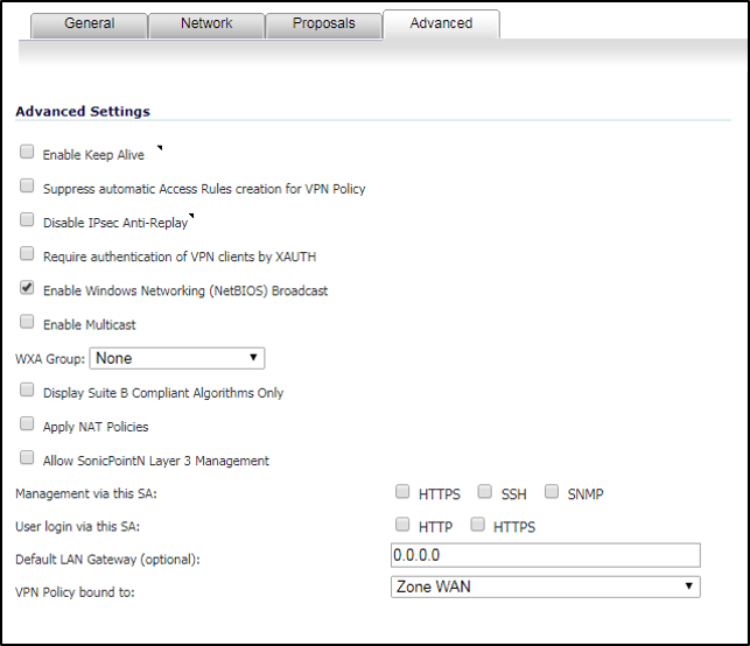
- Ở tab Advanced
- Chọn mục Enable Windows Networking (NetBIOS) Broadcast
- Ở mục WXA Group: Chọn None
- Ở mục Default LAN Gateway (optional): Nhập 0.0.0.0
- Ở mục VPN Policy bound to: Chọn Zone WAN
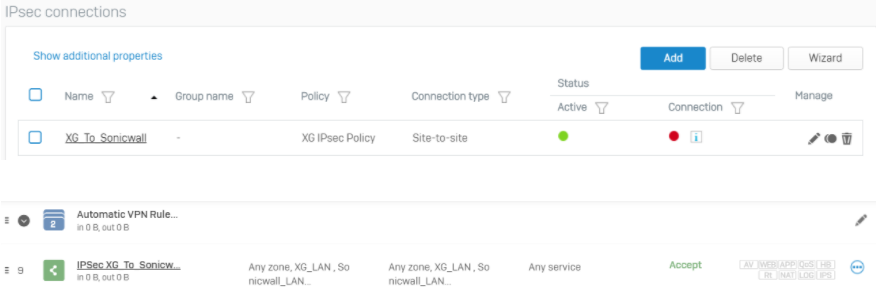
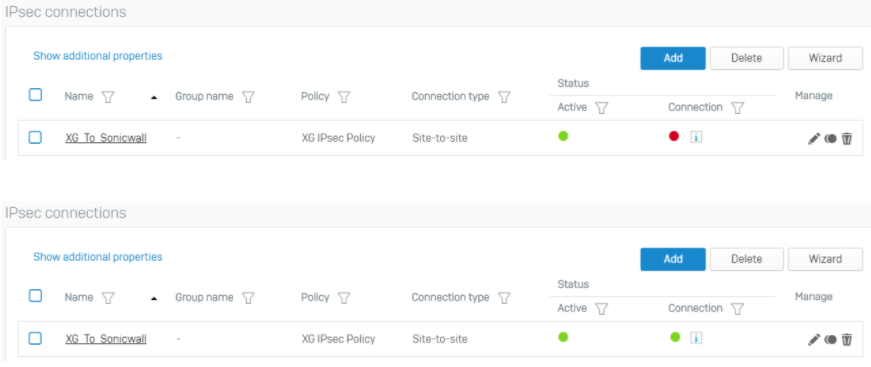
- Kiểm tra kết quả trên Sophos XG
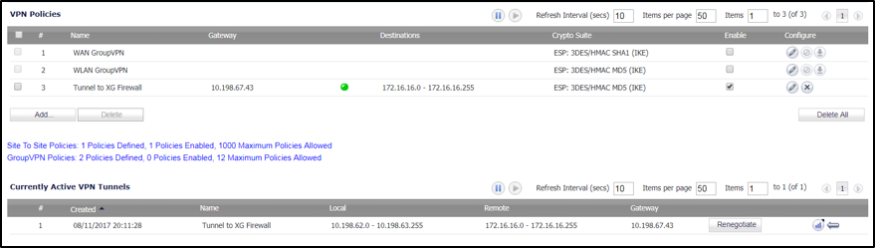
- Kiểm tra kết quả trên SonicWall
- Thực hiện test ping giữa hai site